Learn the easiest ways to braid manes with this step-by-step tutorial.
Top-notch turnout. It’s how you let everyone know they’re in the presence of your passion—your horse.
Meticulously groomed and braided horses are breathtaking to behold and create a winning first impression. This level of grooming takes elbow grease and attention to detail, and you’re probably wondering how are those oh-so-perfect mane braids created?
I’m Mary Beth Rohaly of braidsecrets.com. I teach equestrians like you how to create flawless mane braids for successful shows.
In this article, I share expert tips on how to create the three easiest mane braids; a running braid, dressage button braids, and hunt seat braids. You’ll also learn what equipment and supplies you’ll need, how to prepare a mane for braiding, and when to use each type of braid. So, let’s get started!
Horse Braiding Equipment
You have a couple of options when it comes to braiding tools. You can either gather your own or purchase a complete braiding kit.
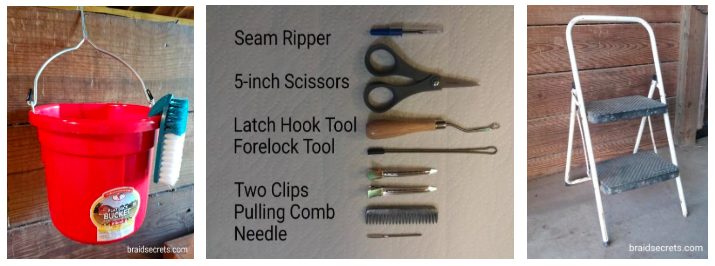
If you decide to assemble your own set of braiding tools, here’s a checklist of what I recommend for mane preparation and braiding.
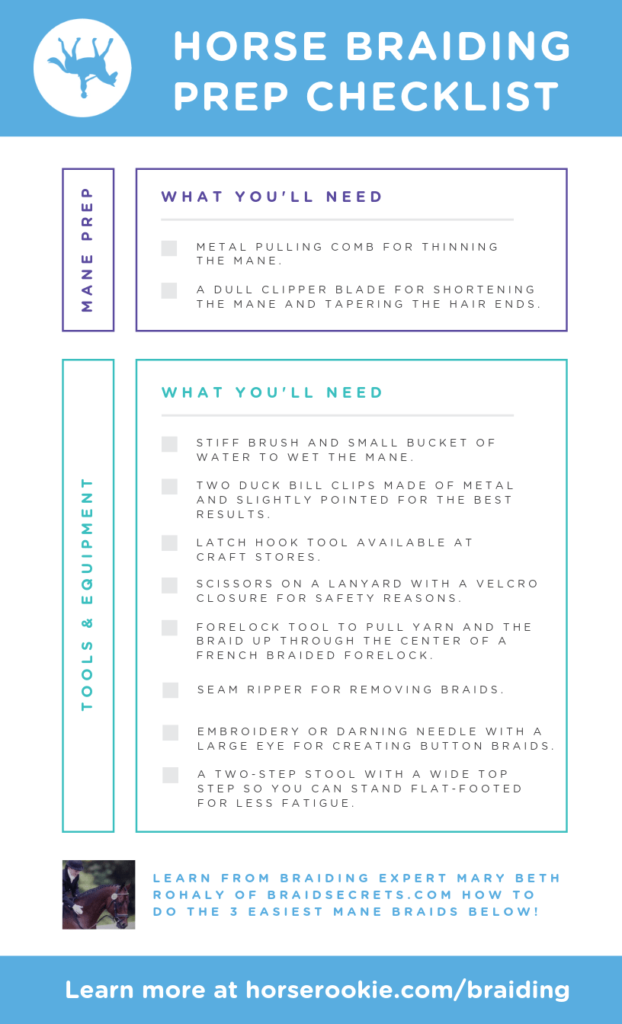
Here’s a handy checklist so you have everything you need when you start braiding.
To braid efficiently, you need to keep all of your braiding tools at your fingertips so that you don’t have to get down off your braiding stool each time you need a particular tool.
Want to create your own forelock tool in minutes? Check out my DIY Forelock Tool Tutorial.
Braiding essentials
If you purchase your own tools, you can put them in a braiding organizer that has fitted pockets and slides onto your belt.
(Note: This organizer also comes with a storage bag to keep everything clean when not in use.)
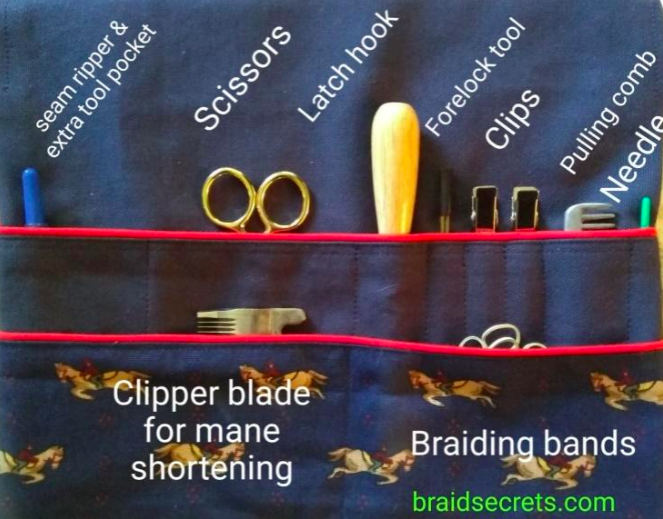
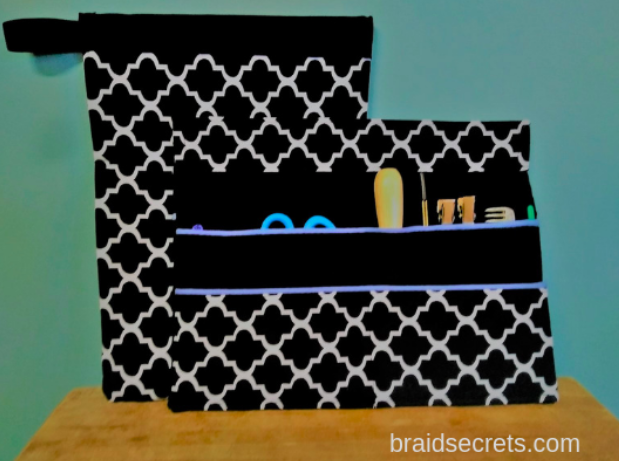
If you decide to purchase a braiding kit, look for one with sturdy tools and a storage bag. The Brilliant Mane Braiding Kit shown below has custom storage pockets and includes the tools you need for braiding.
It slides onto your belt and sits at your hip while you’re braiding. When you finish braiding, the kit folds in half and slides into a matching bag for convenient storage.
Braiding Supplies
Did you know that you need incredibly strong yarn for equestrian braiding? I recommend using a medium-weight yarn that you can’t break with your hands. Thin yarn will cut into your hands like a fishing line. Ouch! Thick yarn won’t result in tidy knots, so it’s not suitable for braiding.
My favorite is Red Heart Classic Yarn. This yarn is strong, just the right weight so it’s easy on your hands and it comes in colors that match your horse’s mane. It’s not expensive, but it can be hard to find in stores. Click here to purchase it at Yarnspirations.
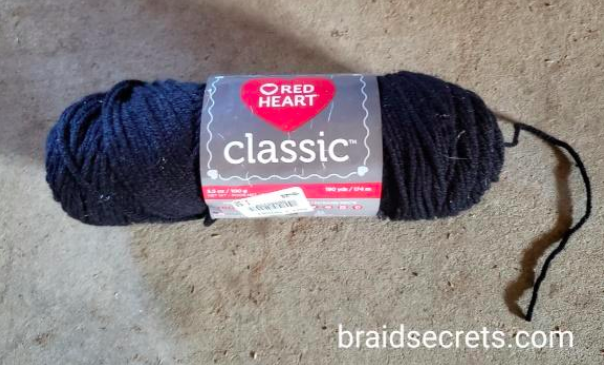
This is my favorite yarn for braiding.
Expert Tip:
Does your horse have a white mane? White yarn makes a horse’s mane look dirty. For the best braiding results, use an off-white or a light grey yarn.
Expert Tip on Braiding Yarn:
Very few yarns are suitable for braiding since they will break when you’re tying your braids down in the final step. I don’t recommend making substitutions with any other Red Heart yarns or brands for braiding.
If you’re creating a running braid, you’ll also want to purchase a package of elastic bands for braiding in a color that matches your horse’s mane. These bands are used to secure the braid. Click here to purchase them at Amazon.
How to Quickly Cut Yarn for Braiding
Here’s a method for quickly cutting yarn to the perfect length for button and hunter braids.
- Find the end of the yarn coming from one end of the skein.
- Grasp the yarn end between your thumb and first finger.
- Wind the yarn from your hand around your elbow and back up to your hand, like you’re winding a cord (see photo).
- Each revolution will create the yarn piece for one braid, so wind as much yarn as you think you will need.*
- Cut straight across the yarn you’ve wound and then loop the yarn pieces through your belt near your dominant hand.
*Typically, it takes 12 to 15 pieces of yarn for button braids and 30 to 40 pieces for hunter braids, depending on the mane.
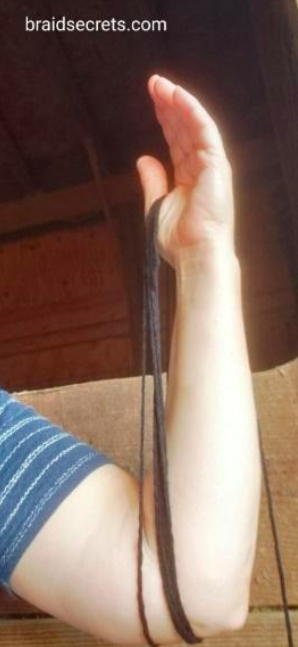
This is the easiest way to cut the correct yarn lengths for braiding.
How to Prepare a Horse’s Mane for Braiding
If your horse has a long mane, and you only plan to create a running braid, you can skip the mane preparation steps below. But be sure to at least read my tips on mane cleansing and conditioning.
For button braids and hunt seat braids, mane preparation is key.
Braiding an unprepared mane is like trying to stay on a diet with junk food all around you. It’s just plain difficult! Why? Because the condition of the mane IS the foundation of your braids.
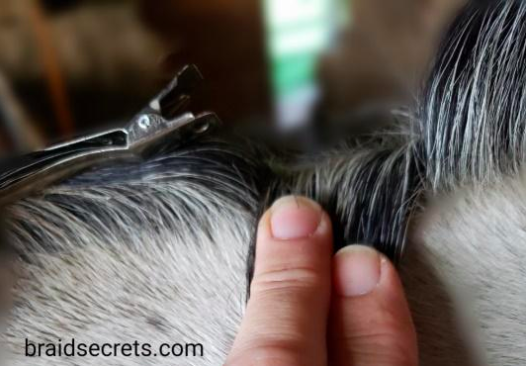
Flawless mane braids are easiest to create on a mane that’s an even thickness from poll to withers and approximately four-to five-inches long with tapered hair ends.
In this photo, you can see the dramatic difference between a prepared and an unprepared mane.
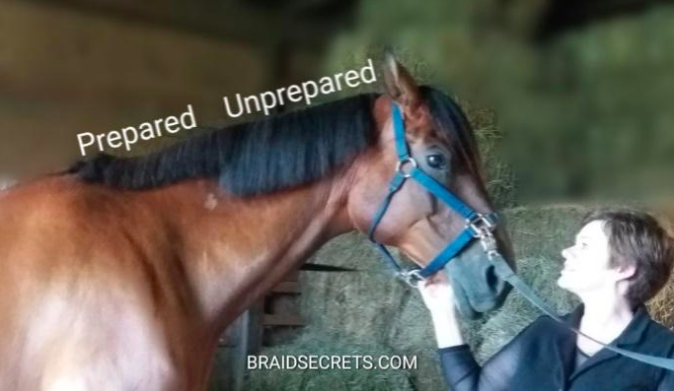
The section on the left is ready to braid.
Knowing how to evaluate and prepare a mane for braiding is one of the best-kept secrets to creating top-notch braids with ease.
In my Braiding to Win VIP Experience for riders, the mane evaluation and preparation video is one of the most raved-about pieces of training.
It’s where I go into detail about how to determine your horse’s mane type and customize mane preparation for easier braiding and fabulous results in less time.
Basic Steps – How to Prepare a Mane (Button or Hunt Seat Braids)
Here are the basic steps for preparing a mane:
- Pull the mane to an even thickness from poll to withers (if needed).
- Shorten the mane to 4-6 inches long (based on mane type) and taper the hair ends.
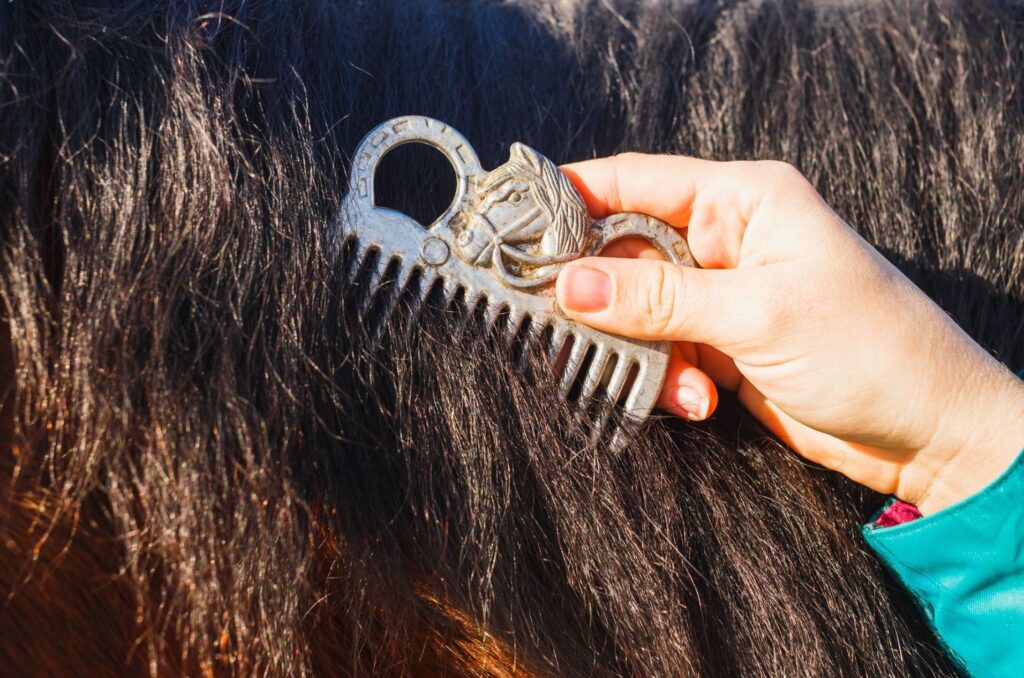
Step 1: How to Pull a Mane Peacefully
Many horses will stand quietly for mane pulling (thinning), but sensitive horses often dislike mane pulling.
For this reason, I like to use a peaceful mane-pulling technique to keep them happier and less stressed. I demonstrate this technique in my painless mane-pulling video in my Free Resource Library. (Click here to sign up for instant access.)
Fellow riders report jaw-dropping results when using my peaceful pulling method!
Here’s how it’s done:
- Backcomb a small section of hair up close to the neck.
- Wrap the remaining hair around the pulling comb near the neck.
- Place your thumb on top of the hair.
- Put downward pressure on the hair until you feel it release on its own. (You’ll actually feel a ”pop” as the hairs release.)
- Comb down and continue across the mane, one small section at a time.
Expert Tip:
It’s best to pull a thick mane over a couple of weeks so that hair regrowth doesn’t become a braiding problem later. This little-at-a-time approach is also less stressful for your horse.
My suggestion is to work on thinning the thick areas of the mane for five minutes a day after you ride.
This is the best time for this task since manes are easier to pull after exercise because the pores are open and the hair releases easier.
Source: Canva
Step 2: How to Shorten a Mane & Taper the Hair Ends
Once the mane is an even thickness, you need to shorten it to 4-6 inches long, after it clears the crest. Note: If you’re creating button braids, you can leave the mane slightly longer.
The best mane length for your horse’s mane depends on the mane type (thin, average, or thick).
I have a wonderful clipper blade technique that I use to shorten a mane. The advantage to using this technique is that it creates tapered hair ends so that it’s easy to tie your braids off and tuck them up in the small space at the crest.
I demonstrate this technique in the video titled, Five Secrets for Perfect Mane Braids, in my Free Resource Library. (Click here to sign up for instant access.)
Here’s how it’s done:
- Backcomb a small section of hair up toward the neck using a dull clipper blade.
- Hold the remaining hair with the fingers of your left hand.
- Press down on the hair with the clipper blade (held in your right hand) at the mane length you want.
- Work across the mane in small sections backcombing and shortening the mane as you go.
- Comb down the mane frequently to identify any areas that need shortening.
Here’s a photo of a well-prepared mane that’s ready for button or hunter braids.
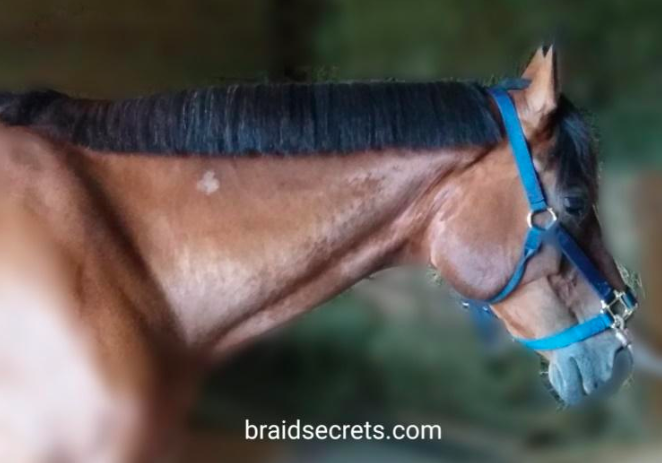
This mane is ready to braid!
Expert Tip:
Never cut the mane or create blunt ends when shortening a mane. Blunt ends are the enemy of good braids because they’re nearly impossible to tie off at the bottom of the braid and tuck up into the small space at the crest. Plus, braiding a blunt mane is really hard on your hands.
Mane Cleansing and Conditioning Dos and Don’ts
No matter what type of mane braiding you plan to do, wash your horse’s mane thoroughly a couple of days prior to the show. Then just rinse the mane if needed.
Avoid applying any conditioner or hair polish to the mane because this makes it slippery and nearly impossible to braid well.
Expert Tip:
Washing the mane in advance helps the mane have a slightly tacky texture on the day you plan to braid it, instead of a slippery one.
Source: Canva
Running Braid
The running braid is one of the simplest and fastest braids to complete. It’s considered proper turnout for breeds that are groomed to have a long-flowing mane, such as Arabians.
Running braids are mainly used for hunt seat or
dressage classes at breed or open shows.
Remember: this type of braid can only be created with a long mane!
Basic Steps – How to Create a Running Braid
The mane needs to be combed out so there are no tangles. It should also be free of any conditioner.
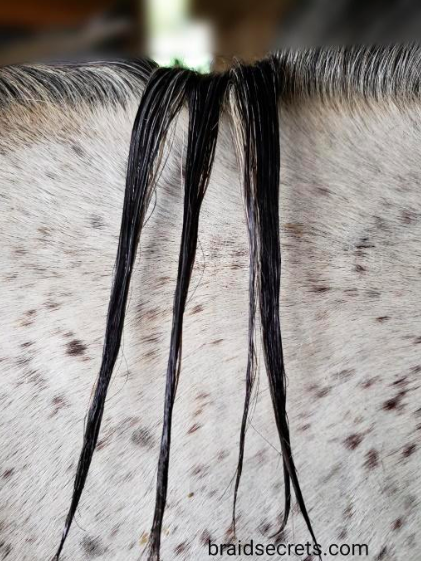
Wet the mane and section off a couple of inches of mane near the poll.

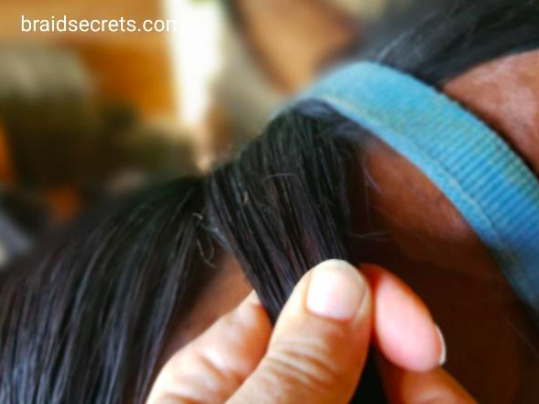
Divide the section into three pieces and start a regular three-strand braid.
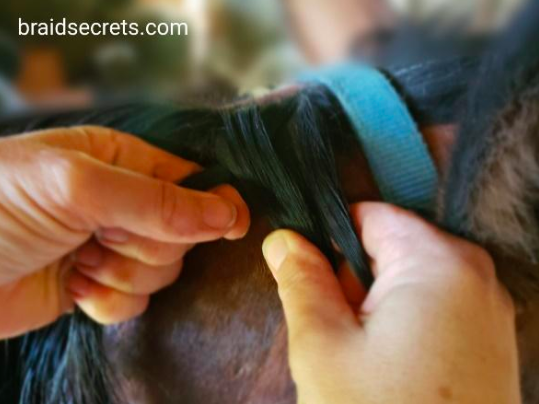
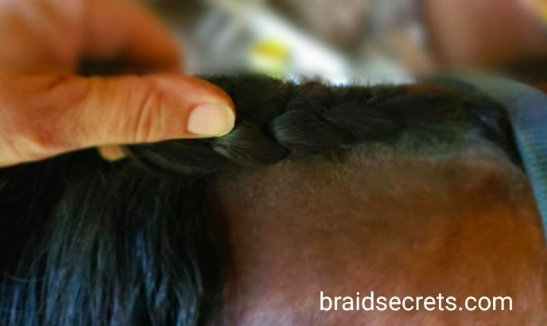
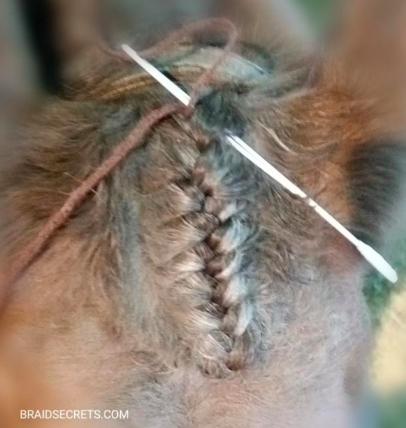
Each time you cross the hair section over the braid that’s closest to the crest, add hair to the braid (see photo). You’re essentially adding hair to one side of the braid.
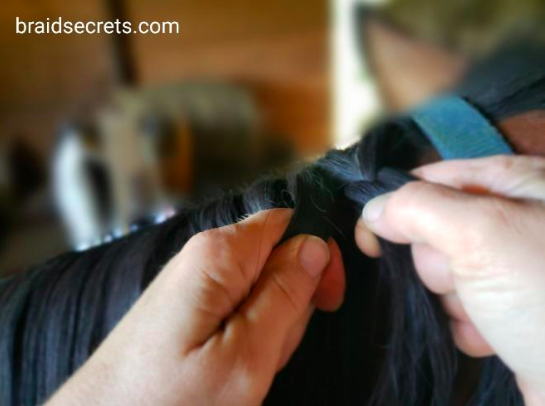
Follow the arch of the neck and keep the braid close to the crest.
End the braid near the withers by securing it with an elastic band. Turn under and secure with a second elastic band.
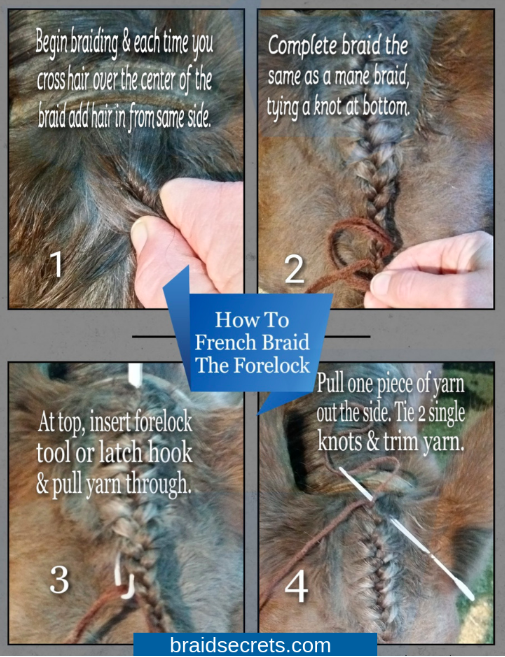
The final step is to French braid the forelock. See my picture tutorial below. If you need help learning to create the French forelock braid, watch the video Five Secrets for French Braiding the Forelock available in my Free Resource Library.
Expert Tips:
- Have a helper position your horse’s neck in the same position it will be in when you’re showing.
- Plan to do the running braid as close to your show class time as possible, as it tends to fall out more easily than other types of braids.
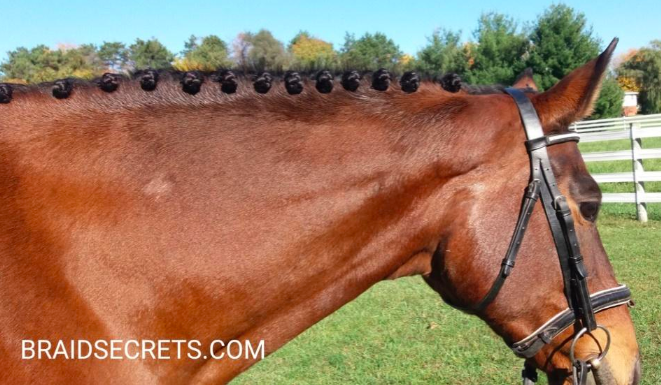
Dressage Button Braids
Dressage button braids
Button braids are considered proper turnout for
One of the nice things about button braids is that you only need to create 12 to 15 braids across the mane to get the desired look and highlight your horse’s neck.
There are many ways to create button braids, such as using yarn, elastic bands, or cotton thread.
My favorite method for creating button braids is to use yarn and incorporate it right into the braid.
I prefer this method because it creates neat braids that are very secure. That’s important since some horses tend to rub their braids.
Make sure you look your best in the
dressage arena, too, with these 4 dressage fashion trends and salute-worthy styles.
Basic Steps – How to Create Button Braids
Below is a picture tutorial on how to create button braids. I also demonstrate many of these techniques in braiding videos in my Free Resource Library.
Button braid tutorial:
Use the pointed end of your duck-billed clip to section off four-fingers width for each braid and secure each section with an elastic braiding band.
Start at the poll, wet the first section, and divide the hair into three equal pieces. Begin braiding down the mane in a regular three-strand braid.

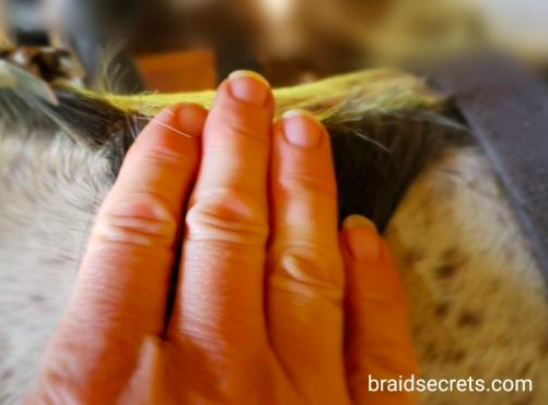
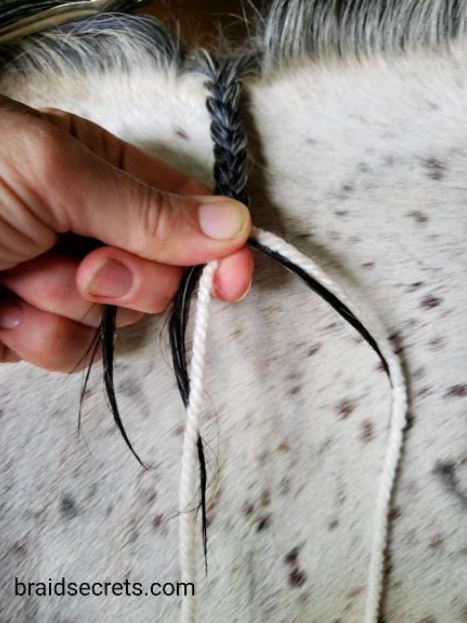
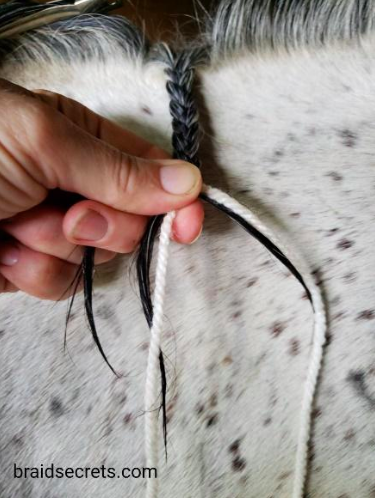
Halfway down the hair shaft, pause to add a piece of yarn you have folded in half into the braid by placing the fold under your thumb (see photo below). The yarn will join two sections of the hair. Continue braiding to hair ends.
Tie a slip knot at the bottom of the braid using the following steps:
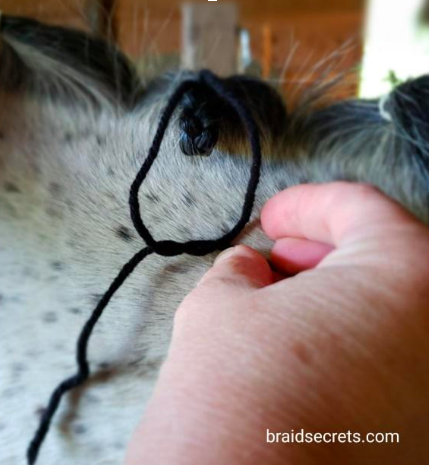
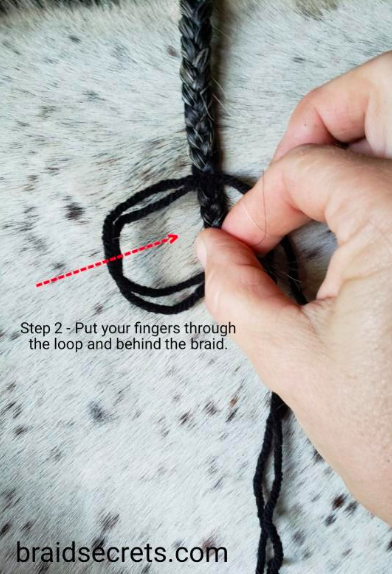
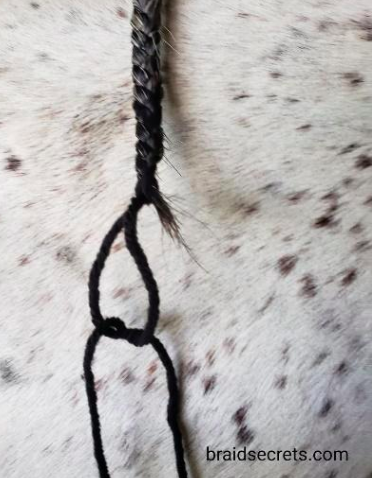
Step 1: Lay both pieces of yarn over the braid (see photo below).
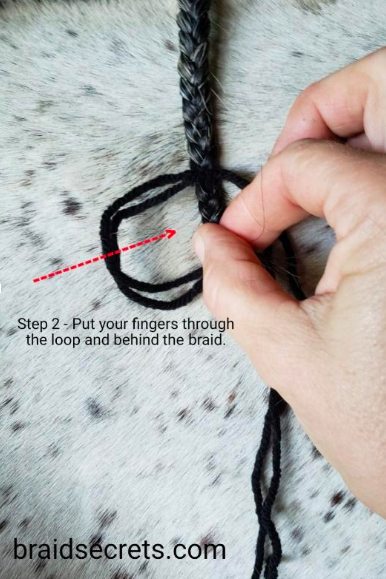
Step 2: Put your fingers through the loop (to the left of the braid) and behind the braid.
Step 3: Grasp the yarn pieces (on the right side of the braid) and pull them back through. Then pull the knot tight.
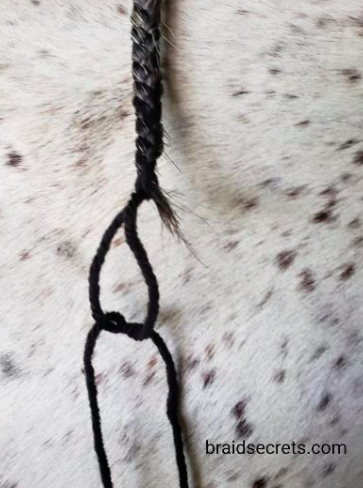
Tie a single knot to prevent slippage.
Continue to braid down each section until all the mane is braided, ending each braid at the same point.
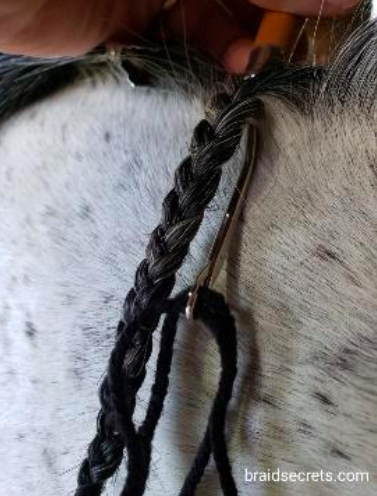
Pull all the braids up. To do this insert a latch hook tool down through the center of each braid. Lay both pieces of yarn in the hook and close the latch. Pull the yarn up through the braid. Pull all the braids up in this manner.
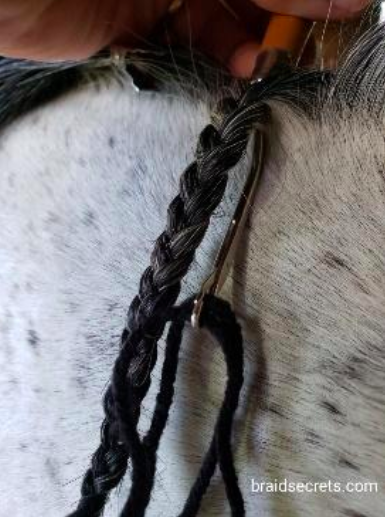
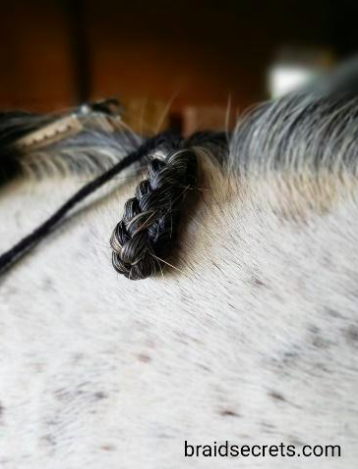
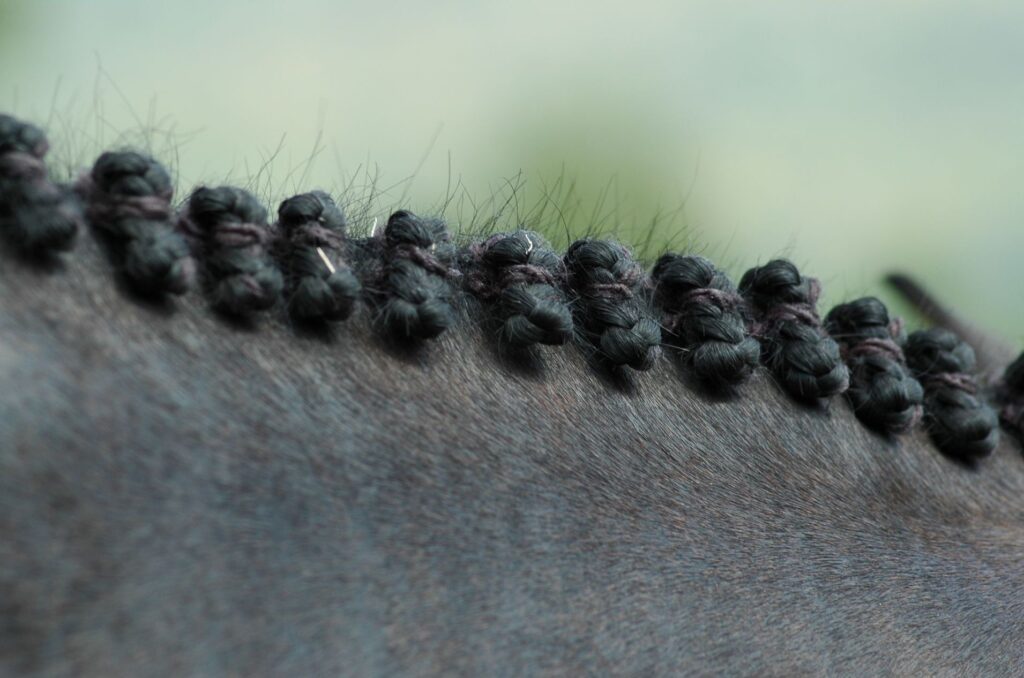
Pull the bottom knot of the braid up just inside the crest as shown in the photo below.
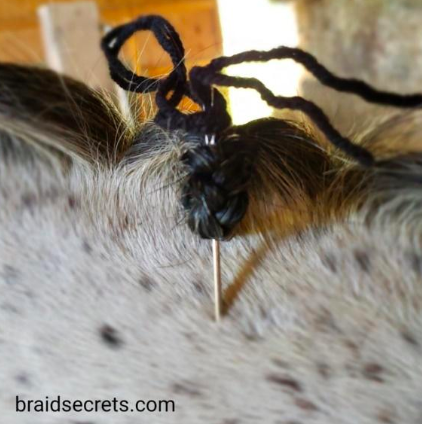
Thread the yarn pieces from the first braid through the eye of your embroidery needle.
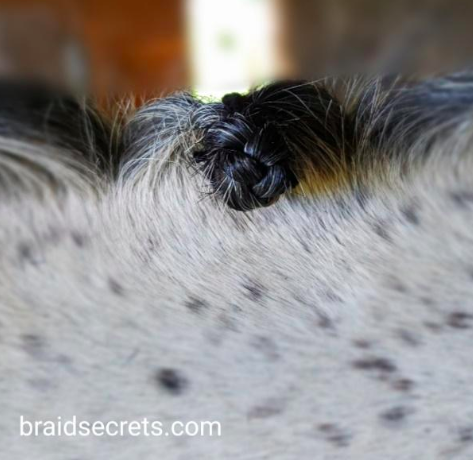
Fold the braid in half to form the button.

When you’re pleased with how the button looks, use your needle to sew the yarn down and up through the thickness of the braid.
Remove the yarn from the needle. Grasp one piece of yarn in each hand. Tie two, single knots under the braid as shown in the photograph below.
Trim yarn pieces close to the braid.
French braid the forelock for a polished look.
If you need help learning to create the French forelock braid, see the video on Five Secrets for French Braiding the Forelock available in my Free Resource Library.
Hunt Seat Braids
Source: Canva
High-quality braids help make a winning first impression on the judges. Riders competing in hunt seat classes need to create hunter braids for proper show turnout.
Hunt seat braids are created on short manes for breeds like warmbloods, thoroughbreds, and quarter horses.
Hunter braids are created by braiding yarn into approximately 30 to 40 individual braids depending on the mane thickness. Next, the braids are pulled up and tied down, so they lie flat against the neck in a flattering manner.
Hunter braids are considered the most difficult to learn but you can create them with greater ease and perfect results when you (1) prepare your horse’s mane based on the mane type, and (2) learn the tricks of the trade by acquiring a little expert braiding knowledge.
This is what I teach fellow riders in my Braiding to Win VIP Experience.
Basic Steps – How to Create Hunter Braids
Below is a picture tutorial of how to create hunter braids. I also demonstrate many of these techniques in braiding videos in my Free Resource Library.
Hunter Braid Tutorial:
Wet the mane and use the duck-billed clip to section off two-fingers width of mane, clipping back the remaining hair.
Divide the section into three pieces and begin braiding down the mane.
Halfway down the hair shaft, add a piece of yarn you have folded in half into the braid by placing the fold under your thumb (see photo below). The yarn will join two sections of hair. Continue braiding to hair ends.
Tie a slip knot at the bottom of the braid. To do this, (1) lay both pieces of yarn over the braid (see photo below), (2) Put your fingers through the loop (to the left of the braid), go behind the braid, grasp the yarn pieces (on the right side of braid) and pull them back through. Pull the knot tight.
Next, tie a single knot to prevent slippage.
Continue to section and braid down until all the mane is braided, ending each braid at the same point.
Now you need to pull all the braids up. To do this insert a latch hook tool down through the center of each braid. Lay both pieces of yarn in the hook and close the latch.
Pull the yarn up through the braid. Pull all the braids up in this manner.
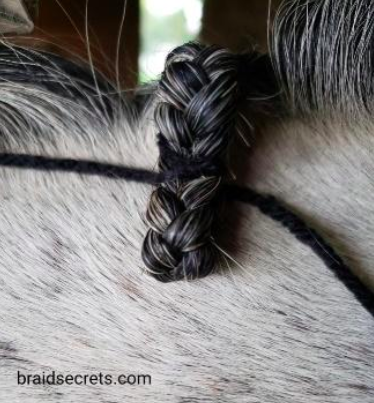
Pull the bottom knot of each braid up just inside the crest as shown in the photo below.
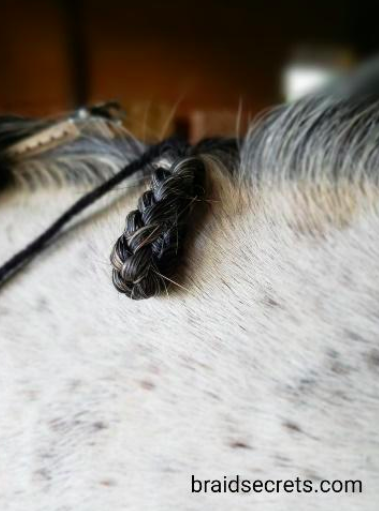
Cross both pieces of yarn behind the braid. Don’t tie a knot under the braid.

Tie a surgeon’s knot in the center of each braid.
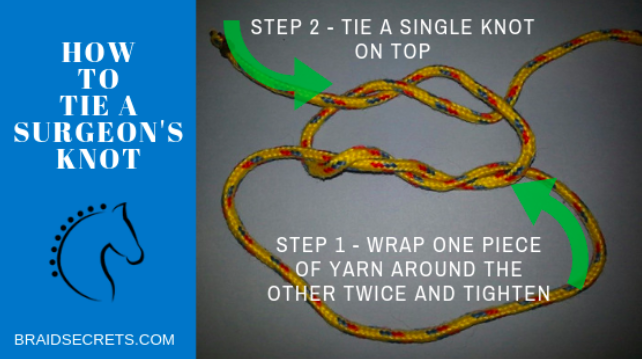
Step 1 of surgeon’s knot.
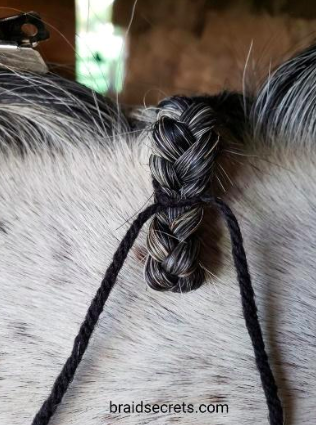
Step 2 of surgeon’s knot.
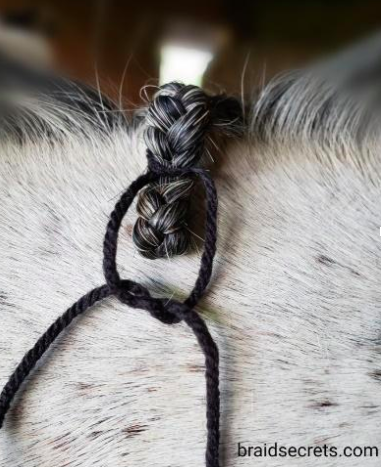
Step 3 of surgeon’s knot.
Tie two, single knots behind the braid and trim the yarn close to the braid.
French braid the forelock for a polished look. If you need help learning to create the French forelock braid, see the video on Five Secrets for French Braiding the Forelock available in my Free Resource Library.
Frequently Asked Questions
Q: How to braid a horse’s mane with yarn?
Measure the yarn and cut it into pieces about 20 inches long (a little over or under is fine). Make sure your horse’s mane is clean, detangled, and slightly thinned.
Divide the mane into a two-inch section. Start braiding it, keeping the braid neat and tight. Halfway through, add in the yarn. You need both ends for later, so “attach” the yarn to the braid in the middle of the strand.
Use the yarn to tie two tight knots at the end of the braid. Make an overhand knot, securing it well. Pull the yarn through, then tie it once above and below the knot. This video makes for a great visual:
Q: Do braids hurt horses?
They can if they are done too tightly or kept in for too long. The process of braiding is usually painless, as long as you take care around the crest and the dock. I like to leave braids a little looser at the top and start pulling tightly a few crosses down.
If you braid your horse’s mane or tail loosely (to keep his tail clean or to keep his mane off his neck when it’s hot), it’s OK to leave these braids in for a few days or even a week. Generally, it’s best to keep your horse’s mane and tail au natural as much as possible.
Q: What is the easiest horse mane braid?
The running braid is the easiest to learn and perfect. It’s a variation on the classic French braid and can be created easily without preparing the mane the first. It is mainly used in
Brilliant Braids Await
I hope you found these tips helpful when you try creating the three easiest mane braids.
My advice about learning to braid or improving your current braids is to (1) gain expert knowledge about braiding, and (2) practice mastering those techniques on a small section of mane.
You don’t have to practice braiding the entire mane in order to improve your braids.
Your efforts will be rewarded. There’s nothing like the feeling of pride and confidence you’ll have walking into the show ring on your impeccably turned-out horse!
P.S. Enjoy this article? Trot on over to:
- 4
Dressage Fashion Trends and Salute-Worthy Styles - 3 Best
Dressage Boots for Horses Moving Up the Levels - Horse Mane Braiding Demystified (Tools, Types, FAQs)
- How to Pull a Horse Mane (And When NOT To)
- Mane Braiding FAQ: Hunter vs.
Dressage Braids - 7 Ways to Wow Judges & Improve Your
Dressage Scores - Five Tips To Help You Prepare For A Horse Show
- How to Ride and Show Horses Without a Trust Fund
- Packed to Perfection: The Ultimate Horse Show Packing List
- 18 Gift Ideas for Horse Owners Who Seem to Have Everything
About the Author
Mary Beth Rohaly went from struggling to braid a mane to a braiding expert. She is passionate about teaching other riders how to transform their mane braids from mediocre to magnificent for successful hunt seat and
She is the creator of the Braiding to Win VIP Experience where she provides expert braid evaluations, and personalized advice, and teaches her complete step-by-step Braid Secrets system in bite-sized training videos.
This experience focuses on hunter and
All levels of braiding are welcome to join, whether you’re just learning to braid or have experience. You’ll shorten your learning curve and benefit from Mary Beth’s hard-won knowledge and the experience of braiding thousands of horses.
Mary Beth Rohaly is also a featured Braiding Expert on Jane Savoie’s
Visit braidsecrets.com for blog posts, additional information, and products. Or, connect with Mary Beth on Facebook and Pinterest.