
Mane Magic: How to Create Beautiful Braids
One of my favorite things about horse shows is seeing all the expertly turned-out horses. From shining coats to braided manes and tails, everyone loves the look of a show horse! Braiding a horse’s mane and tail not only has a functional purpose, but it is also a way to make a winning statement in the show ring.
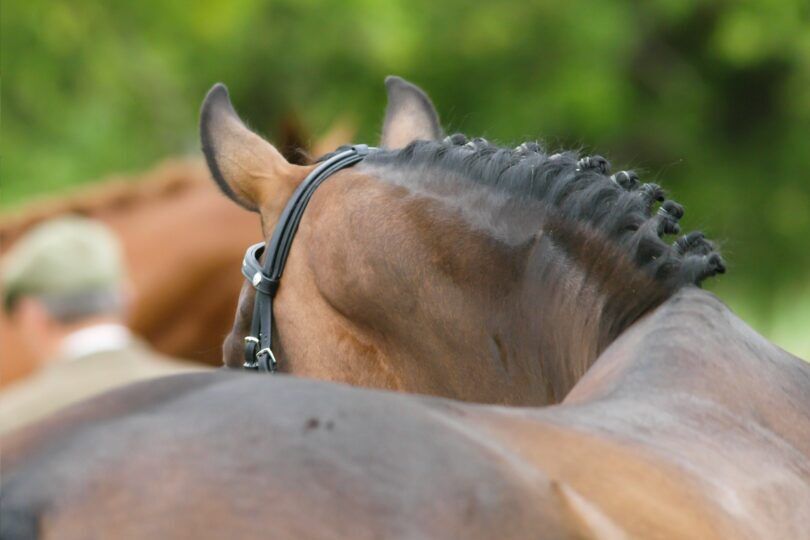
Braiding spans many disciplines, with forms of it found in hunters, jumpers,

Source: Canva
The History of Braids
Horse’s manes have been braided for centuries. Prior to the invention of automobiles, horses were the main source of transportation and were also used in times of war. For practical purposes, braiding kept a horse’s mane out of the way of equipment.
Braiding is a great way to prevent tangles and knots from forming and can also help keep a horse cool in warmer climates.
Today, braids are used in the show ring to enhance the appearance of a horse and help emphasize the shape and form of their neck and head. In addition to highlighting their confirmation, a neat and tidy braid shows that the rider and horse are serious competitors who have put in the effort to prepare for a show.
After all—first impressions are essential, especially in the show ring.
Source: Canva
The BRAID Necessities
No matter what kind of braiding you do, you will need a specific set of supplies to help you make the best braids possible. I have created my own “braiding kit” that I keep in a zippered tote bag. It’s easily transportable to the barn or to shows. Here’s a list of what is in my bag and each item’s purpose:
Mane Comb
Use this to pull the mane to create an even starting point. I also have mine marked to a specific width so that all my braids are the same.

Click to see braiding combs at Amazon
Hair Clip(s)
I prefer the larger ones that are easy to slip through hair. You can get these at Sally’s Beauty Supply or on Amazon. These are great for separating the mane and keeping the loose hair out of the way.

Click to see clips at Amazon
Yarn
Yarn is necessary for hunter braids and can be useful for jumper/button braids as well. You can match the yarn to your horse’s hair or use a slightly different (yet similar) color.
I have learned from years of taking out braids that by using a slightly different color, it is much easier to remove braids after a long day of showing.
For example, for darker/black manes, I use dark navy yarn. It isn’t noticeable in the ring and can save you a lot of squinting and frustration at the end of the day!
Quick Knots
I got a sample of these from a subscription box service, and I’m kind of obsessed. Though they don’t work for hunter braids, they are a super fun (and quick!) way to do button braids. Check them out here!
Small Scissors
These are needed for trimming the yarn once you’ve secured the braid. You’ll want to select a small pair of scissors. A pro tip I learned from another braider is to keep them around your neck with a long strand of yarn! I prefer thread trimmers like this one.
Seam Ripper
You will use this at the end of the day to take the braids out—or if you need to fix one! Be careful when using this tool, though, since they are sharp!
Get a single seam ripper or get a whole kit with scissors!
Latch Hook
This handy dandy device will be used to grab the bottom of the braid and bring it up and through to finish the look.
Braiding Spray/Product
Much like styling gel or mousse for humans, this helps keep the braids in the place. Different people will have a preference for what works best for them, but these are my top 2 favorites:
Braiding Bands
These are perfect in a pinch for quick repairs and are ideal for banding, like what you’d see in Western disciplines. I most often use them to ‘retrain’ a mane to fall to the right. This brand comes in a variety of colors!
Source: Canva
Large Sewing Needles
You’re going to want them to be blunt, so you could use metal or plastic. I find the plastic ones can break, so make sure you have extras! This kit has both.
Braiding Fanny Pack/Storage
Having something you can wear while you are braiding for all your supplies will save you time. A waitstaff apron is a good option or a one hip tool belt.

Click to see it at Amazon
Step Stool
Horses are tall! I recommend getting a portable step stool that you can easily carry around from stall to stall. This is a great two-step option, but if you are on the shorter side, you may need to get a three-step!
The MANE Event
Each discipline has a different style of braids, so it is important to know what event you are braiding for.
Hunter Braids
These braids are smaller than other styles and take the shape of a thin rectangle on the horse. You can have over 30 hunter braids in a mane. In fact, it is ideal to have somewhere between 30-40 individual braids. They are smaller than button braids to highlight the conformation of the hunter horse.
This style of braid (and discipline) comes from the fox hunt, where horses’ manes were braided to keep them tidy and clean on the hunt.
To begin, make sure you have a clean (but not conditioned!) mane that is pulled to an even length and thickness.
Use your hair clips to section off the mane into sections, making it easier to work with.
Starting at the poll, take a very small section of hair, apply some quic braid, and braid down, like you’re doing a basic braid on someone’s ponytail.
Pro tip: Make sure you are braiding “down” by pulling toward the ground as you braid. Don’t pick your hands up toward the sky when you braid—it will save you a lot of grief and keep your braids tidy and neat.
After you have braided about 10 passes, add the yarn and continue to braid. It is a good idea to keep track of how many passes you make in each braid and keep it consistent. When you get to the bottom of the braid, use the yarn to tie it off. Make sure you do a good knot to keep it tight!
Push the end of your latch hook through the top of the braid, behind the braid at the base of the neck. This means your hook should be under your braid. Grab the yarn tied off at the bottom and pull it up and through.
Repeat steps 1-5 over and over again, until all of your braids are done down the neck.
When all of the braids are done, go back to your first braid and begin your finishing knots. I have heard this called the bobble! Make sure the ends of the braid aren’t sticking through and tie a surgeon’s knot. Then use the remaining yarn for a single or double pass-around braid and finish with a double knot in the back.
Trim the yarn and your braid is done! Only 30-something more to go….
For the forelock, you will do a basic French braid, and add the yarn about 8 passes down. Finish the braid like you would for the mane, and use your latch hook to bring the bottom through the top. Instead of doing a bobble, you will just tie a finishing knot.
Jumper Braids
Though similar to hunter braids, these braids are thicker in width and have fewer braids in total. Jumper braids are easier in that they can be done with yarn or elastic bands.
Begin in the same manner as hunter braids, but with bigger sections.
If you choose to use rubber bands, use them at the end of each braid.
Tuck the banded bottom under the top part of the braid, and then fold it in half again. With your free hand add another band in the middle.
Repeat! You should have between 12-20 jumper braids in total.
Dressage Braids
Similar to jumper braids, they are larger with fewer braids down the neck. I have always called these “button” braids because they end up looking round like a fancy button! You will have between 11-17 braids in total. You can use elastics or yarn for these braids. For the elastics, I really recommend using them with quick knots.
If you are using yarn, instead of braiding down to create crisp braids, you will braid “up” or away from the horse for the first five or so passes for a fuller look. You will also use a wider section of hair than a hunter or jumper braid.
Lay the yarn in the same manner you would for a hunter braid (after 10 passes) and continue braiding down.
Tie off the braid at the bottom.
For this, you will use a large sewing needle. You will put the yarn through the eye of the needle and then bring the bottom of the braid through the top at the base of the mane.
Once pulled through, fold the braid in half again like you would for a jumper braid. Then “sew” the braid in place by passing the needle up and down through the braids a few times and tying it off.
For the forelock, do a French braid and then use yarn or elastic to create a finished look similar to the jumper braid or hunter braid.
A TAIL as Old as Time
A braided tail is a great way to finish your horse’s show look and is expected at higher level hunter divisions. You can do either a Dutch or French braid.
Pro Tip: I recommend using more Quic Braid than you think you need because tails have a lot of wispies and flyaways!
Start at the top of the tail and use very small strands of hair. You will continue the braid to the base of the tailbone.
Once you get to the base of the tail, continue the braid and work in a piece of yarn like you would for a hunter mane braid.
When the braid is complete, wrap the finished braid all the way around the tail. Use your latch hook to catch the yarn and tie off the braid.
Source: Canva
I’m with the BAND
Banding is a common braiding technique used by Western riders. It is a simple and efficient way to keep a horse’s mane neat and tidy.
Make sure you are working with clean hair that is tangle free.
Use your hair clips to section off the hair you aren’t working with.
For banding, you will want thinner sections of hair, similar to the width of hunter braids.
Comb through the small section and about an inch away from the base of the neck, add a rubber band. You don’t want it to be so tight that it could break easily, but tight enough that the elastic won’t fall off. Depending on the bands you’re using and the thickness of the mane, you may need to wrap the band anywhere from 6-12 times.
Pro tip: Try using a hair gel or pomade on your fingers to help prevent blistering from friction on the bands.
Once you have finished banding the whole mane, it is common to trim the mane to one even length. Make sure you are using sharp shears.
Looking for more pro tips on mane braiding? Check out this article!
Frequently Asked Questions:
Q: How long does it take to braid a mane?
The length of time it takes to braid a mane can vary enormously depending on the condition of the horse’s mane (thickness and texture), skill of the braider, type of braid, and level of the event.
A skilled braider working on a ‘tame’ mane may be able to complete hunter braids for a high-level show in approximately an hour.
Q: How much does it cost to have your horse’s mane braided?
Cost will vary depending on the braider’s skill and the level of the event. Average braiding costs at a horse show could range anywhere from $50-125.
Q: How long do braids last?
Generally, you should braid (or have your horse braided) the day of or the night before your event. Once the braids are complete, it’s not a bad idea to protect them by covering them with a sleazy. That way, if your horse decides to lay down, you don’t have to pick a thousand pieces of sawdust out of your horse’s mane!
If you’re going to be showing on different days, you might be able to get away with one braid job by covering the braids with a sleazy, when you’re not riding. This will also depend on the horse—some horses will rub. If your horse isn’t very patient about having braids in, remove them after your class and re-braid again before the next event.
Source: Canva
Q: When should you take braids out?
For your horse’s comfort, it’s best to remove braids as soon as you can after your last class. Some horses will rub at braids, which can remove hair, resulting in unwanted bald patches.
In Conclusion
Like anything in the equestrian world, practice makes perfect. In my braiding journey, I’ve definitely made some wonky bobbles and ugly button braids! But the more I work at it, the better I am getting.
Braiding is truly an art! From the precise style of hunter braids and banding to the elegant
P.S. Enjoy this article? Trot on over to:
- Mane Braiding FAQ:
Dressage Braids vs. Hunter Braids - Expert Tips on How To Create the 3 Easiest Mane Braids
- 4
Dressage Fashion Trends and Salute-Worthy Styles - 3 Best
Dressage Boots for Horses Moving Up the Levels - How to Pull a Horse Mane (And When NOT To)
- How to Ride and Show Horses Without a Trust Fund
- Packed to Perfection: The Ultimate Horse Show Packing List
- 18 Gift Ideas for Horse Owners Who Seem to Have Everything


