
Enjoy Safe Horse Hauling With Tadi Brothers
Do you worry when hauling your equines? Want a way to reliably see that troubling blind spot behind your trailer? Reduce the stress of trailering your beloved animals with visibility where you need it most.
Tadi Brothers 2-camera system is an easy solution to increase the safety of your animals in transit. Now, I have a backup camera for when I’m navigating a tight trailer parking situation, and I can sneak a peek at my equines while we’re traveling down the road.
Take $150 off the purchase of a Digital Wireless Horse Trailer Rear View System with 2 Cameras at TadiBrothers.com using code “HR150.”
(Offer Expires 1/31/2024)

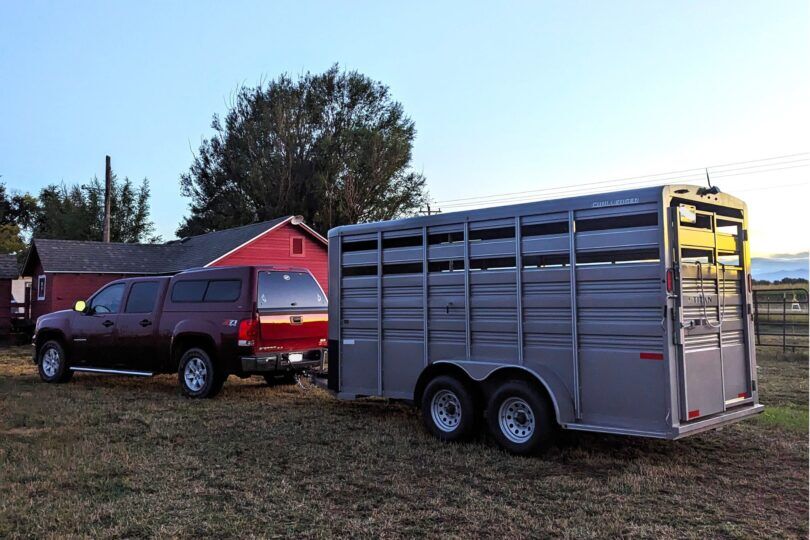
Horse Rookie Photo from Actual Product Testing
I am a planner—it’s in my DNA to think of the worst-possible scenarios. If something goes awry, I’m ready to pivot to another plan. While this can be helpful, it also means I have a lot of anxiety around hauling my equines.
A constant source of stress is thinking “What if something goes wrong in the trailer and I don’t know?”
Fortunately, modern technology can help. With a strategically-placed camera, I can easily spy on my animals en-route, putting my mind at ease. The Tadi Brothers Digital Wireless Horse Trailer Rearview System with 2 Cameras has been the perfect solution for my trailer setup.
What is a Trailer Camera?
While most new vehicles are equipped with backup cameras, they are not typically included in horse or livestock trailer designs, leaving you with a giant blind spot behind your trailer.
It’s also unlikely that your trailer will come equipped with cameras to monitor what’s going on inside. If you want to be able to keep an eye on your equines to ensure they are traveling comfortably and safely, consider investing in an after-market trailer camera system.
Tadibrothers is here to help. They’ve been investing in technology, innovating, and marketing after-market wireless camera systems that solve a variety of solutions since 2003.
Take $150 off the purchase of a Digital Wireless Horse Trailer Rear View System with 2 Cameras at TadiBrothers.com using code “HR150.”
Summary
The Digital Wireless Horse Trailer Rearview Camera System is a great way to make hauling safer for your and your equines. I opted for two wireless cameras which seamlessly connect to a monitor in your vehicle, quickly providing visibility where you need it most.
What We Love
- The ability watch our equines en-route to ensure everyone is traveling comfortable
- Elimination of the blind spot directly behind your trailer
- Easy wireless connection from trailer to cab
- Quality images in real-time
- Small, inconspicuous cameras
- Flexibility to mount both cameras using the same holes
- System comes with a standard 1-year warranty
- Free shipping, free returns, and free support
- No additional apps needed–plug it in and go!
What We Don’t
- You’ll need some basic electrical and mechanical knowledge for installation, or you should hire it out
- The cameras only work if the vehicle lights are on (depending on your trailer)
- You may not want to permanently mount the monitor in your tow vehicle
- The monitor is powered using a cigarette power adapter, which limits where you can plug it in
Who Can Benefit from a Trailer Camera System?
If you’re new to pulling a trailer, or plan to do a lot of solo driving with your rig, a camera system can be a great way to provide peace of mind.
The ability to monitor your horses in the trailer can alert you to danger, such as a hoof getting stuck in a hay net. (That’s happened to me before!)
A rear-view camera on your trailer can save you several trips in and out of your tow vehicle to check how close you are to your back-up target. That rear-view camera could be life-saving in the case of a child or animal running behind the trailer where you can’t see them.
First, let’s review what came in the box.
- 1 7.1” x 4.8” digital monitor with 4 channels and a split screen; includes cigarette power adapter
- Metal U-bracket & butterfly mount w/ double-sided adhesive for monitor in tow vehicle
- 2 Digital Wireless Birds Eye Cameras
- 2 2.1mm DC Barrel connectors
- 2 short & long U-brackets for each camera
- 3 antennas (1 for each camera, 1 for monitor)
- Antenna extender with base (10 ft)
Split monitor view of both trailer cameras
How To Use Your Trailer Camera System
It’s pretty easy–plug the 7” monitor into the cigarette power adapter, turn on your vehicle lights*, and place the unit where you can see it.
In our borrowed GMC Sierra, the display monitor props up against the windshield and stays in place pretty well!
- On our model of trailer, there isn’t a constant power source. So, the truck lights have to be on for the trailer lights to be on. This is because the trailer lights have to be on for the cameras to have power.
- You can adjust the display to show both cameras or just one. I like to use the full screen rear backup camera for when we’re parking.
- Then, when we’re ready to roll, I change the display to the full screen of only the interior of the trailer so I can better monitor my equines.
Take $150 off the purchase of a Digital Wireless Horse Trailer Rear View System with 2 Cameras at TadiBrothers.com using code “HR150.”
When we’re driving long distances on windy roads through the mountains, it’s really nice to be able to sneak a peek and seek the donkeys riding comfortably!
How to Install the Wireless Cameras
To start, wireless refers to the connection between the two cameras and the display monitor in the tow truck. The cameras do need to be wired in for power.
Disclaimer: Installing these cameras requires basic electrical knowledge.
If you know how to identify a ground wire and have spliced wires together previously, you’ll probably be fine. If you aren’t confident in your ability, please consider hiring out this step. It’ll be well worth it to ensure it is done correctly!
Backup Camera installed on trailer
Experience: My husband is very savvy at vehicle repairs & maintenance, so for him, this project was pretty easy. For me, it would have been completely out of my comfort zone.
Difficulty: On a scale of 1 to 5, with 1 being the easiest possible installation and 5 being the most difficult, my husband rated this project a 2.
The project itself wasn’t difficult, but some of the instructions were not as detailed as we would have liked. However, it was easy to troubleshoot and figure out a solution on our own.
Time: If you know what you’re doing and have everything you need ready to go, this project should take about an hour to an hour and a half to complete.
Your first step should be deciding where you’ll mount the cameras. This will influence what you need to accomplish the task.
I knew I wanted one camera as a trailer backup camera, and 1 interior camera to spy on my donkeys as we’re winding over mountain passes. Originally, I thought I’d mount the interior camera to the front of the trailer facing backwards.
However, it worked really well to mount the interior camera at the rear of the trailer facing forwards.
This allowed us to use the same set of four holes for both the interior and exterior cameras, which minimized the number of holes we had to drill through the trailer siding.
This location also worked well as we were easily able to connect the cameras into the existing electrical wiring system.
What you’ll need for installation:
- Safety glasses
- Tight-fitting mechanic style gloves
- A drill and drill bits
- Allen wrench (included)
- A Phillips screwdriver and box wrench (depending on the mounting hardware you select)
- Hardware for installing your cameras (important to note, these were not included)
- Bolts, washers and locking nuts (4 or 8 depending on how you mount the cameras)
- Wire pliers
- Electrical wire butt connectors with heat shrink (heat shrink ensures weather tight seal)
- A lighter
Rear backup camera installed on my stock trailer
Tips for Camera Mounting
Wear your PPE (personal protective equipment)—we recommend gloves and safety glasses. One of the drill bits shattered while my husband was drilling the hole through the side of the trailer, narrowly missing his eye and cutting his hand and eyebrow. Always put safety first!
The hardware for mounting the brackets was not included. Since we were mounting the cameras in the same place (one facing inwards and the other outwards) we only used four bolts and nuts. If you’re mounting the two cameras in completely different places, you’ll need eight.
We’d suggest using locking nuts and washers, as the cameras will experience a lot of vibration and bumps in this particular application.
Take $150 off the purchase of a Digital Wireless Horse Trailer Rear View System with 2 Cameras at TadiBrothers.com using code “HR150.”
When mounting the brackets, place the bracket where you want it then use a permanent marker to mark the holes.
First, use a small drill bit to drill a pilot hole in the place you’ve marked. Then, when you use the bigger drill bit, it will be easier to create the correct size hole.
The cameras are rotation-dependent, which we didn’t realize. When we first installed the cameras, the images happened to be upside-down. This was easy to fix (but an unnecessary added step) by flipping the camera 180 degrees.
The mounting brackets didn’t clearly indicate which direction was up vs down. So, we didn’t get the range to tilt the camera down enough for the full trailer backup view the first time. However, it was relatively easy to flip the mounting bracket which provided for a better angle to view.
As you can see, we had to flip cameras and brackets multiple times to get everything dialed in! I’d definitely suggest waiting to tighten things down all the way so it’s easiest to change things around.
Once the cameras are mounted, you’ll need to wire them in. Drill another (bigger) hole for the outside camera’s wire.
This requires a larger drill bit than what was used for the bracket holes. Fortunately, this portion of the process was very well outlined in the instructions. The instructions said to use a 20mm drill bit but we used a 19mm / ¾” drill bit with great success.
Interior Camera for Interior Trailer View
Tips for Electrical Wiring
If you have a moderate knowledge of electrical wiring and have previous experience wiring electronics, hooking up the cameras was relatively easy. If you don’t know how to identify a ground wire or how to heat shrink wiring to weatherproof it, I would not recommend attempting this step on your own.
According to my husband, “It was the easiest wiring job I’ve ever done.” However, I have a basic knowledge of electrical wiring and you couldn’t have paid me to touch this step on my own. It’s all about what you’re comfortable with!
Always use caution when working with electricity. Make sure the trailer (including batteries if your trailer has them) is disconnected from any source of power.
Traditionally, backup cameras are wired into the reverse lights, activating the camera when you place the vehicle into reverse. We wired them into the standard lights (same as the interior camera) so the feed could be accessed at all times, not just when you are in reverse.
Heat shrink on the butt connectors for the wire weren’t specified in the instructions. However, my husband thought that this was a good idea to make everything more weather-proof. This step might be optional, but we wanted to go the extra mile to ensure the safety of our trailer and to minimize any electrical issues in the future.
It is easy to do. Once the wires are connected, apply heat (we carefully used a lighter) and the material “shrinks,” forming a seal.
Parting Thoughts
Overall, this trailer camera system was relatively easy to install and set up. I’ve used it for a few short hauls already and can tell it will be a huge asset for longer trailering journeys in the future!
Ready to shop? View the camera package reviewed in this article here.
Take $150 off the purchase of a Digital Wireless Horse Trailer Rear View System with 2 Cameras at TadiBrothers.com using code “HR150.”
Monitor view of interior trailer
Frequently Asked Questions
Q: Can you put a reverse camera on a trailer?
Yes! You can absolutely put a backup camera on your trailer. It’s actually easier than trying to install one on your car.
Q: Are trailer backup cameras worth it?
Trailer backup cameras are a great investment in safety, minimizing blind spots and allowing you to back into tighter spots with ease.
Q: Which is better, wired or wireless backup cameras?
Wired backup cameras tend to have better picture quality. That said, I’ve only used this wireless camera system, which has great image quality, and was easier to install.
This article is part of our High-Tech EQ series of in-depth, personal reviews highlighting how technology helps equestrians save time, do things safer, and provide peace-of-mind. Our team has 30+ years of experience working in the tech industry and understands what makes (or breaks) “smart” products.
P.S. Enjoy this article? Trot on over to:
- 4 Best Eventing Watches for Cross-Country Countdowns
- 6 Genuinely Useful Apps for Tech-Savvy Equestrians
- 5 Best Helmet Mounted Cameras to Record Your Ride
- 20+ Horse Technology Essentials That Make Life Easier
- 11 High Tech Equine Wearables to Revolutionize Your Ride
- Invictus Equestrian Collection Revealed
- Equine Coaching On Demand
- Equestrian Hit Air Vest Review: My Favorite Fall in 30 Years


