Improve your riding balance, flexibility, and focus
Let’s face it: it’s challenging to stay balanced and in proper alignment on a moving horse. To ride well, we need to be fit and strong — yet also supple and relaxed. If we become too stiff, we can’t move with the horse. But if we can’t stabilize or are too loose, we feel like we’re “flopping around” in the saddle. Postural tendencies and old injuries can further block our ability to move freely and effortlessly with a horse.
It’s time to rediscover your balanced, strong, and confident self. This article walks you step-by-step through the top 5 stretching yoga poses for equestrians:
- Mountain
- Low Lunge
- Rag Doll
- Downward-Facing Dog
- Warrior II
Martha Graham, a renowned ballet dancer and choreographer, taught that “sensation is the language of the body.” Yoga, through its physical postures, breathing practices, and focus on mindfulness teaches us this language. It allows us to regain our graceful movement patterns by improving our strength, flexibility, and body/mind awareness.
#1: Mountain

Mountain pose
Mountain Pose is a yoga posture that builds awareness of our postural habits in terms of the spine and pelvis.
Do you tend to arch or round your back? Slump your shoulders forward or squeeze your shoulder blades together? Jut your chin out or tuck it in? These upper body tendencies will likely be exacerbated when riding.
If you can find your neutral spine on the mat or in yoga class first, it will be easier to find it in the saddle.
As we make adjustments to optimize our posture in this pose, we build the muscle memory and strength necessary to sustain that position with less effort over time.
We learn how to stack our joints as we feel what it’s like to be balanced with a neutral spine and pelvis.
HOW TO STRIKE THIS POSE:
- Come to stand with your big toes together and heels slightly apart or, for more stability, with your feet hip-distance apart.
- Evenly distribute your weight across your feet (front-to-back as well as side-to-side).
- Draw energy up the legs, pulling your kneecaps up and engaging your quadriceps.
- Lengthen through the front and back sides of the body to stand up tall.
- Rotate your outer upper arms (triceps) back to roll your arms open until the palms face forward.
- Send energy down the arms and out through the fingertips, straightening the arms as much as you can.
- To find your optimal alignment in the pelvis and spine, press both thigh bones (femurs) straight back (you may notice that when overdone this brings your lower back into an arch), then draw your tailbone down until you feel like your pelvic bowl is upright and neutral and your lower back is long and in a natural curve.
- Next, draw the shoulder blades down the back and in towards the chest and spread them apart to widen the upper back.
- At the same time soften your front ribs down towards the floor until you feel like you are open across the chest and yet relaxed.
- Finally lift your chin until it is parallel with the floor and reach up through the crown of the head so it feels like your head is directly centered over your pelvis.
#2: Low Lunge
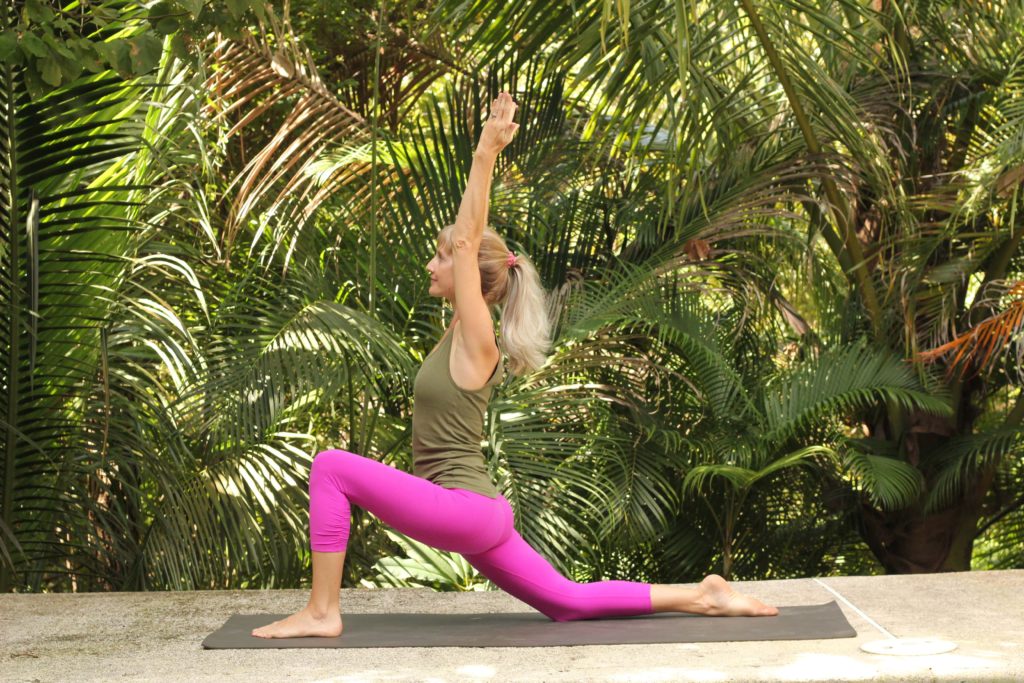
Low lunge pose
In general, Low Lunge builds strength in the legs as well as stretches and releases tension in the groin, hips and thighs. Notably, it lengthens the iliopsoas muscle and other important hip flexor muscles (the front thigh of the back extended leg).
This extension of the back leg at the hip joint is a great antidote to those who spend a lot of time sitting.
Less tension and restriction in the rider’s hips allows the horse to move comfortably with his/her back relaxed. The action in the arms also stretches across the chest and the shoulders.
Finally, Low Lunge teaches us how to maintain a neutral spine and pelvis even as we change what is happening in the legs and hip joints. As a rider, this allows you to keep an open hip angle (not gripping with the leg “up”) without arching in the low back.
HOW TO STRIKE THIS POSE:
- Come to stand at the top of your mat and take a big step back with one foot towards the back of your mat.
- Make sure that your feet are hip-distance apart rather than on a tightrope.
- Drop the back knee down onto the mat and rest the top of the back foot on the mat.
- Bend your front knee to come into the pose and ensure that your front knee is directly over the front ankle — not in front of it (you should be able to see your toes).
- You can start with hands on the hips, on your front knee or extend your arms overhead with both arms straight, palms facing one another and shoulder-distance apart.
- If the back knee is tender in Low Lunge, you can place a blanket under your knee or press into the top of the back foot to relieve the pressure on the kneecap.
- Look straight forward or up towards your hands. Try to relax the shoulder down away from your ears, even as you stretch through your ring fingers up towards the sky.
- For most of us, the back will want to arch as we bend into the front knee in lunges. Resist this by lifting the frontal hip points (ASIS) up towards the belly and lengthening the tailbone down.
#3: Rag Doll
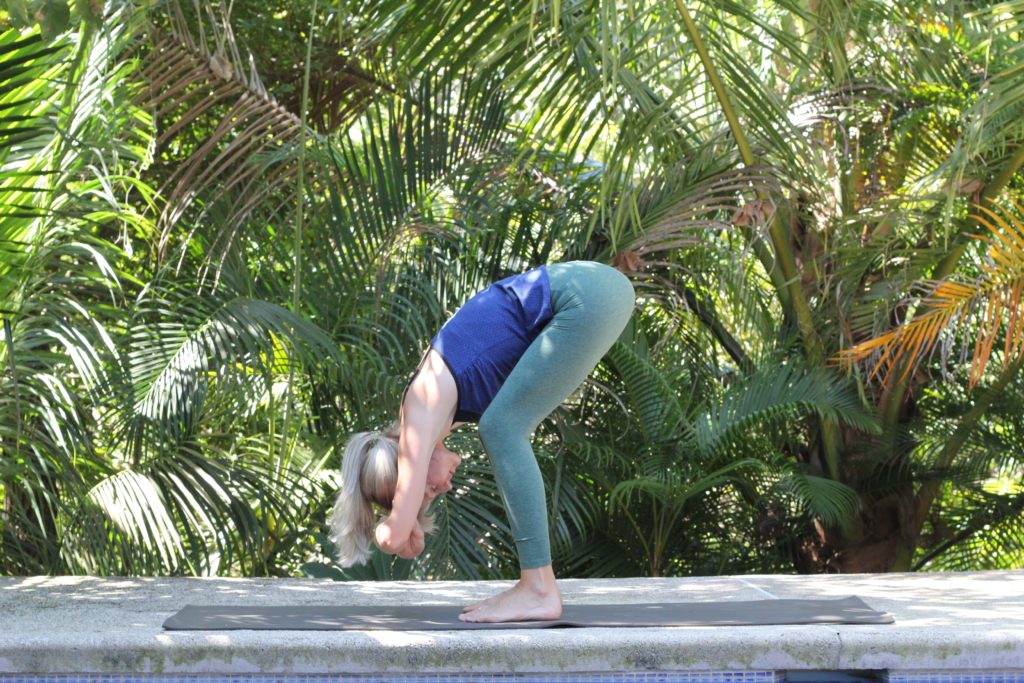
Rag doll pose
Rag Doll is a calming pose and can help in the alleviation of stress, anxiety, and tension. It teaches us that a forward fold is actually initiated from flexion at the hip joint (rather than flexion of the spine).
We learn how to maintain a (mostly) neutral spine as we bend at the hip joint.
We will round some in the lower back in this deep forward fold, but the action is trying to lengthen the front body as well as the back body. This pose also aids in lengthening the back of the legs with a combination , , and calf . .
Excessive tightness in the hamstring muscle, in particular, can affect posture and result in a posterior tilt of the pelvis (tucked pelvis) and tight hips.
Practicing Rag Doll also teaches skills related to two-point position — learning how to fold forward at the hip joint without losing the balance and efficiency of a neutral spine.
HOW TO STRIKE THIS POSE:
- From standing with your feet parallel and hip-distance apart and your hands at your hip joints, bend your knees and slowly fold your torso forward and down from your hips while keeping your spine neutral. Note that flexion of the spine (or bending at your waist) is not what drives this pose — it’s flexion at the hip socket.
- You can keep your hands at your hips for support or grab opposite elbows and allow your arms and head to hang down.
- Bend both knees enough so that you can lift your sit bones up and tilt your pelvis forward, allowing your spine to remain long and supple. Most of us have to bend our knees to really feel this in yoga because the hamstrings limit the ability of our pelvis to tilt forward in relation to the femurs.
- Keep reaching the sternum forward and down to lengthen the front of the body.
- You can straighten the legs to the degree that is appropriate, but try to maintain the integrity in the spine and pelvis.
- To come out of the pose, bring your hands back to your hips and lengthen the spine forward to completely neutral first, then draw the tailbone down and in to lift your torso all of the way back up to standing.
Yoga practice have you hooked? Check out our 5 yoga tips for equestrians.
#4: Downward-Facing Dog
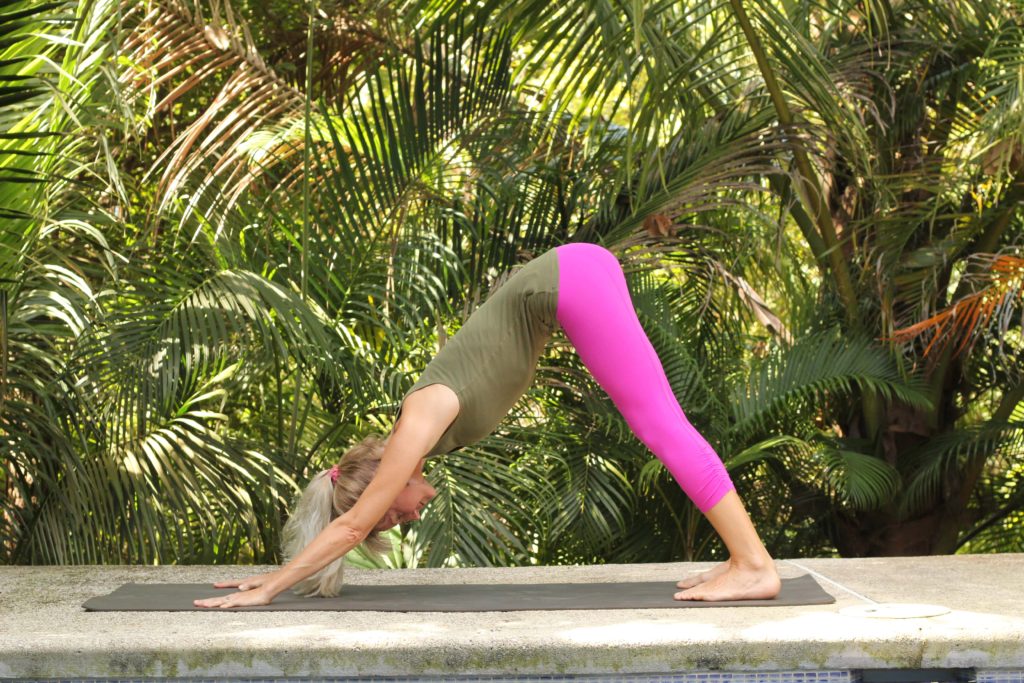
Downward dog pose
Downward-Facing Dog is an energizing pose that is one of the most foundational poses in yoga. Its main purpose is to lengthen the spine. It also requires a great deal of opening of the back of the legs (hamstrings, calf muscles, etc.), ankles, shoulders, and wrists.
As riders, the lengthening of the back of the leg and ankle encourages the heels to drop in the stirrups without pushing the lower leg and foot forward and down.
Relaxing and lengthening the calf allows the heels to deepen. It prevents stiffening in ankle, knee, and hip joints while riding.
HOW TO STRIKE THIS POSE:
- Start on your hands and knees in tabletop position.
- Spread through your fingers and turn your arms out until your index fingers point straight ahead or are slightly turned out.
- Tuck your toes under.
- Slowly lift your knees off the ground and lift your hips up and back.
- Keep knees bent and allow the heels to be lifted if the hamstrings are on the tight side and causing the lower back to round.
- Press into your palms, back of the knuckles, and all of your finger pads equally.
- Draw the chest back towards the legs and bring more weight into the legs.
- Straighten the arms.
- Roll the outer upper arms (triceps) down towards the ground and allow the shoulder blades to slide towards the hips. As you do this, you will likely need to remind yourself to ground down through the index fingers and thumbs so the inner hand doesn’t become light.
- Lift your sit bones up towards the sky as you press your thighbones back and energize your legs. It’s okay if the heels are lifted off the ground, but imagine the back of the leg lengthening down to the ground and try to relax the heels down to the degree they are willing.
- Keep your arms alongside the ears and find a soft gazing point on the mat.
#5: Warrior II
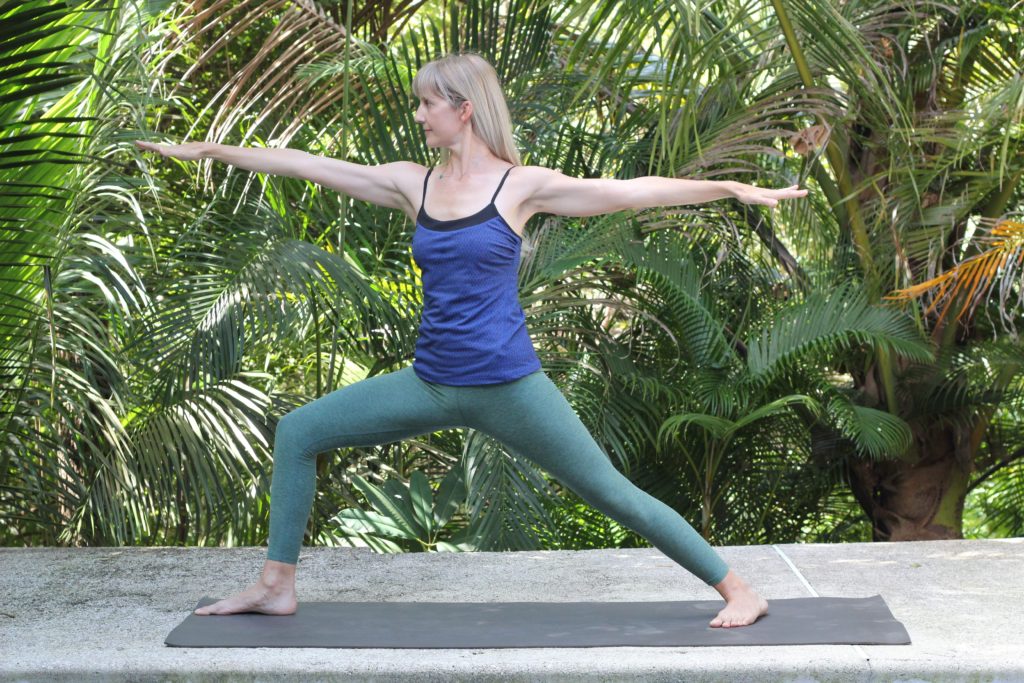
Warrior II pose
Warrior II pose opens the hips and increases the range of motion and circulation in the hip joints and hip flexors. It stretches the groins, spine and waist, strengthens the legs, core and arms and teaches us what external rotation of the front thigh feels like.
Importantly for riders, this pose stretches the inner thigh muscles (adductors) which can help to prevent gripping with the inner thighs against the saddle and horse in a clothespin fashion, which makes us reduce weight in the stirrups.
Stretching these muscles also increases freedom in the hip joint. Warrior II pose also strengthens the outer thigh muscles (abductor muscles) which move the leg away from the body.
It is important to stretch and strengthen both the adductor and abductor muscles to achieve independent and effective leg aids.
This yoga pose also teaches us the position of the shoulder blades and spine with the arms extended out to the sides, which is the same as when they are stretched out in front of you or down along your sides (e.g. when you are horseback riding).
Warrior II pose can be intense, especially when held for a long period of time; this teaches us that even with intensity in one area of the body and while being challenged, we can maintain a soft gaze and relax in other areas of the body and mind.
HOW TO STRIKE THIS POSE:
- Stand with your legs wide apart facing the long side of your mat.
- Extend your arms out to the sides and see that your ankles are directly underneath your wrists to measure the distance between the feet.
- Pick up your right toes and pivot on your heel to externally rotate your right thigh bone (femur) to the right from deep within the hip socket until your toes and knee point straight ahead towards the short end of your mat.
- Scoot your left heel back slightly. You should have heel-to-heel alignment with the feet.
- Bend your front knee as you keep rolling your outer upper thigh down and under you – like a corkscrew – to keep the front knee pointing in the same direction as the middle toe of your right foot.
- At the same time draw your back thigh straight back towards the hamstring to open across the inner groin.
- Continue to straighten your back leg by engaging the quadriceps.
- Drop your tailbone down towards the floor as you sink into the front knee. Always keep the front knee over the ankle — not in front of it.
- Extend the arms out to the sides and reach through your ring fingers, energizing the arms.
- Keep drawing the shoulder blades down the back and pressing them into the chest while softening the front ribs down.
- Finally, reach up through the crown of the head and turn your gaze over the middle finger of the front hand. Repeat on both sides.
Want to mix equestrian yoga and horses on vacation? Learn why we love Big Sky Yoga Retreats so much!
Now Relax & Ride
I hope you enjoyed exploring these poses on the yoga mat and have a chance to bring these concepts into the saddle. There are endless ways to modify these poses so don’t get discouraged.
Remember that these poses are meant to be challenging. They can bring up a lot of limiting beliefs and not-so-pretty patterns in the mind. That’s okay!
The real purpose of yoga, especially equestrian yoga, is to calm the fluctuations of the mind, but first we have to become aware of the patterns and chatter that are constantly happening up there. Only then can we start to make real changes.
Want to learn? Check out my online Yoga for Riders Course.
P.S. Enjoy this article? Trot on over to:
- Get Your Asana in the Saddle: 5 Yoga Tips for Equestrians
- 5 Yoga Poses Equestrians Should Do Before Every Ride
- 3 Best Horse Mounting Blocks
- Big Sky Yoga Retreats Review: Loved It So Much I Moved Here
- Can You Wear Yoga Pants Horseback Riding?
- Equestrian Advice from Margaret Burns Vap: Letter to My Rookie Self
- Equestrian Advice from Jamie Graham: Letter to My Rookie Self
- A Day in the Life of Cowgirl Yoga
- My friend. My family. My companion. (Yoga Instructor Rebecca Hall)